

One thing that can be challenging to photographers is how to organize images in Lightroom, what file structure to use and how to keep your catalog in good shape. It’s easy to simply download photos and put them in a randomly named folder, but then you get to a point where you have photos here, there and everywhere and then you can’t find something quickly when you want it. Or maybe your hard drive is starting to get full and it’s time to clear out those old, unneeded photos and optimize your Lightroom catalog.
So I thought I would give you a few tips to help keep your organized and get rid of bloat. These tips will also help you set up good practices that will help you going forward. I promise you that if you adopt even a couple of these suggestions you will find yourself spending less times trying to find something or worrying about space issues and more time enjoying your photos.
1. Set up a Logical File Structure
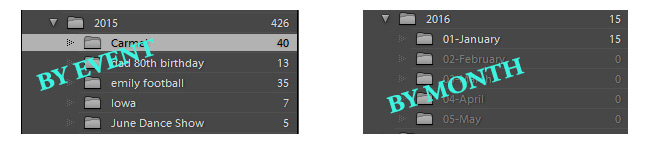
If your photos are in kind of a mess with images and folders scattered on your hard drive, now is a good time to get them organized or set up for 2016. You can organize your image folders in whatever way makes the most sense to you. It should be logical, scale-able, and easy to back up and recover. A lot of people organize by year and month and if that’s what you’ve been doing forever, then it probably works for you. But I know I won’t remember two years from now exactly when I took a particular shot, so I organize my photos by year and event. Whatever you decide, try to be consistent.
Moving Your Images Into New Folders
If you want to reorganize your images and folders, remember, you need to move them from inside LR otherwise it won’t know where they are and you’ll get exclamation points on them (see #3).
- Create new folders inside your root photos folder (My Pictures or whatever you call yours). From the Library Module either click on Library > New Folder from the top menu or from the Folders panel click the Plus sign to add a new folder and name it. You can also right click on a current folder to add a subfolder to it. From Grid View you can select and drag images into your newly created folder(s).
- If you want to organize by date: Create new folders for each year you want to organize, i.e. 2014, 2015, 2016 and within them subfolders for each month or event. Go to your root folder and filter your images by metadata, with “Date” in the first column. If you don’t see the filter bar, hit the “\” key to reveal it. Then click on View > Sort By Capture Time to make sure they are in the exact order. On the upper right side of the date column you will see a little menu symbol. Click on that and select Hierarchical to see them listed by month. Now select the images for each month and drag them into your newly created year/month folder.
Watch my video tutorial for more information on creating new folders.
Tip: If you want to rename your images while you’re at it, click on Library in the top left menu and choose “Rename” or hit F2 on your keyboard and this will bring up the naming dialog. Then you can give your photos a custom name.
2. Organize With Collections
Don’t forget about Collections;they are the linchpin to keeping organized. Once I’ve imported my images I tend to use Collections and don’t touch the folders. Collections are virtual, you are not actually moving any images, and you can have the same image in multiple collections, ex: you could have a photo of your dog at the beach in a Dog Collection as well as a Beach Collection. Think of Collections as photo albums where you put your best photos to show off, rather than every single shot from your vacation. I find that using Collections cuts down on the need to add a lot of keywords to my photos. From the Library module, select the photos you want and click the + sign on the Collections panel to add them to a new collection and give it a descriptive name. Learn more about Collections here.
3. Resolve Photos with Exclamation Marks
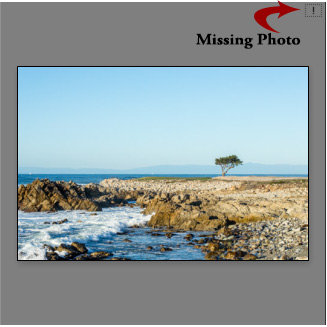
Do you have images or folders in your Lightroom Library with little exclamation marks (!) at the top right corner? That’s because at some point you likely moved those photos or folders or renamed them outside of Lightroom and now LR doesn’t know where they are. Remember that Lightroom uses a catalog, which is a database that tells it everything about your photos from what camera took them to your develop edits and keywords, and, drumroll…where they’re located on your hard drive. They aren’t actually “in” Lightroom, it just created an association with them. So if you go and move them or rename them from Explorer or Finder, how is Lightroom supposed to know what you did with them?
To find all your images with an exclamation mark, from the top menu click on Library > Find Missing All Photos. It helps if you’re in Grid View. Now you will see all the missing photos in one place. Unfortunately Lightroom won’t magically find their new location, you need to tell LR where you put them so it can re-associate them. When you click on an image’s exclamation mark you will be prompted to point to the photo or file in its new location. If you moved a whole group of photos to the same location, Lightroom should locate all of them and relink them, you won’t have to do them individually. Note: if you have an older version of Lightroom (4 and below) you will see a ? mark instead of an !.
4. Get Rid of Bad or Unneeded Photos
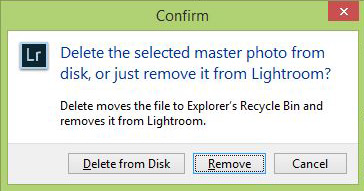 Do you really need 20 nearly identical shots of a seagull at the beach? Now is a good time to get rid of all those near-duplicates that you don’t need, out of focus shots or the ones where someone walked in front of the camera just as you clicked the shutter. This can be tedious, but you will be surprised at how much hard disk space you can recover and you’ll have a slimmer, trimmer catalog. Click on the images you want to delete (hold down the shift key while you click to select multiple images) and either use the top menu Photo > Remove Photo or right click on the image(s) and in the popup menu choose Remove Photo, or use the shortcut Backspace. Make sure you choose Delete from Disk from the dialog prompt box or else it will just remove them from your catalog and not from your computer.
5. Clean Out Most Of The Old Catalog Backups
You should be regularly backing up your Lightroom catalog — please tell me you are, and if you aren’t, go do it right now. It would be awful to lose all your work because your catalog got corrupted. Anyway, you may want to clean out some of the old backups so they aren’t sucking up unnecessary space on your hard drive. Lightroom doesn’t delete old backups so you could have tons of them there.
If you don’t know where your catalog backups are located, or your catalog, for that matter, click on Edit in the top left menu and select Catalog Settings. Go to the General tab and then click on the Show button to view your catalog location in Explorer or Finder. Typically your backups are there as well. Your catalog(s) have a *.lrcat extension. The backups are stored in a Backups folder next to the catalog. If you put your backups somewhere else, the next time you back up Lightroom look in the backup dialog box and you can see where the backups are being stored.
You can delete the older backups to free up some hard drive space. I recommend that you keep a few of the more recent backups just in case.
6. Move Your Images to An External Hard Drive
At some point your photo collection might be getting so large that you want to free up space on your hard drive and move your photos to an external drive. It’s actually pretty easy to do, but the critical thing is to do it from inside Lightroom, or you’ll end up with exclamation marks on everything. My video tutorial shows you how to move your photos the right way.


