Four weeks on and I’ve been playing with my Raspberry Pi in various ways, from using it to browse the web and standard day-to-day computing tasks to playing around with the various configurations that are possible for networking (Ethernet vs USB wireless). But is there an ultimate point to this device, or will it remain a curiosity on my shelf, to be switched on whenever a useful purpose rears its head?
We’ve looked in detail elsewhere on MakeUseOf at the many uses for a Raspberry Pi computer, but one of the most popular is undoubtedly transforming the device into a media streaming or home theatre system.
As I write this, print magazines on newsstands are heralding the arrival of the "£22 smart TV" and the Raspberry Pi certainly affords this type of functionality to a typical flat screen LCD or plasma screen television, thanks to the port of the popular XBMC software, which has resulted in Raspbmc.
Preparing The Raspbmc Software
You should have already followed our previous guide on installing the Debian distro for Raspberry Pi and got yourself up and running.
In order to install Raspbmc, you will need a couple of things. The first is a new SD card – your old one is kind of necessary for running your Raspberry Pi under normal circumstances; it is effectively the Pi’s hard disk drive, so overwriting it will result in you having to reimage the card, which will be approximate to reinstalling the operating system. You don’t have to use a new SD card, but it is recommended. Note that a microSD card with an SD adapter is suitable.
Whichever solution you use, the device will need to be formatted and inserted in a card reader connected to your PC before proceeding.

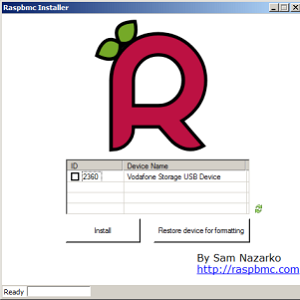
Next, you will need to download the Raspbmc installer. Once saved to your PC, unzip and run the installer.exe file.
Your SD card should be listed in the installer window; check the box and click Install, and the utility will install Raspbmc to the media. When the “congratulations” message appears, it’s time to remove the card and replace it in your Raspberry Pi.

Setup Raspbmc
With your Raspbmc-installed SD card inserted into your Raspberry Pi, switch on the device, ensuring beforehand that it is connected by Ethernet to your router or LAN. Further data will be downloaded as part of the setup, so this is vital.

You won’t need to do anything – unless there is an error with your Internet connection, Ethernet cable or SD card – so sit back and enjoy a coffee (as instructed by the Raspbmc installer!) while you wait.
You’ll know when the media centre is ready…
What You Can Do With XBMC On Your Raspberry Pi
Raspbmc is essentially the popular XBMC media centre project ported to Raspberry Pi. As such the user interface and functionality of the software is more or less identical.

Pictures, Video and Music are split into their own menus, while you can also get weather information for three locations. Media sources need to be manually added while various add-ons can be installed via the Add on-Manager.

What is great about XBMC/Raspbmc is that it is so easy to use – the UI is clear and attractive to look at.
For full details on using Raspbmc, head to the XBMC wiki.
Improving Raspbmc
Setting up this media centre software on your Raspberry Pi is relatively simple, as is connecting media and enjoying the fruits of your (relatively light) labour.
However the system isn’t perfect – codecs for particular file types are not available with the software. Instead, the MPEG-2 and VC-1 codecs must be purchased. Fortunately, they’re relatively inexpensive and can be found at the official Raspberry Pi Website.
Even without these additions, however, your Raspberry Pi will make a great portable media center! And when you're done setting it up, you'll need a projector to make your home theater complete.